

How to Get a Natural Performance in ADR (Without Endless Retakes)
Discover how to get natural, emotionally true performances in ADR. Learn why environment, timing, and comfort matter, and see why filmmakers across Los Angeles trust Genetic Code Pictures for professional dialogue recording that blends perfectly with production sound.

Bringing Real Emotion Back to the Booth
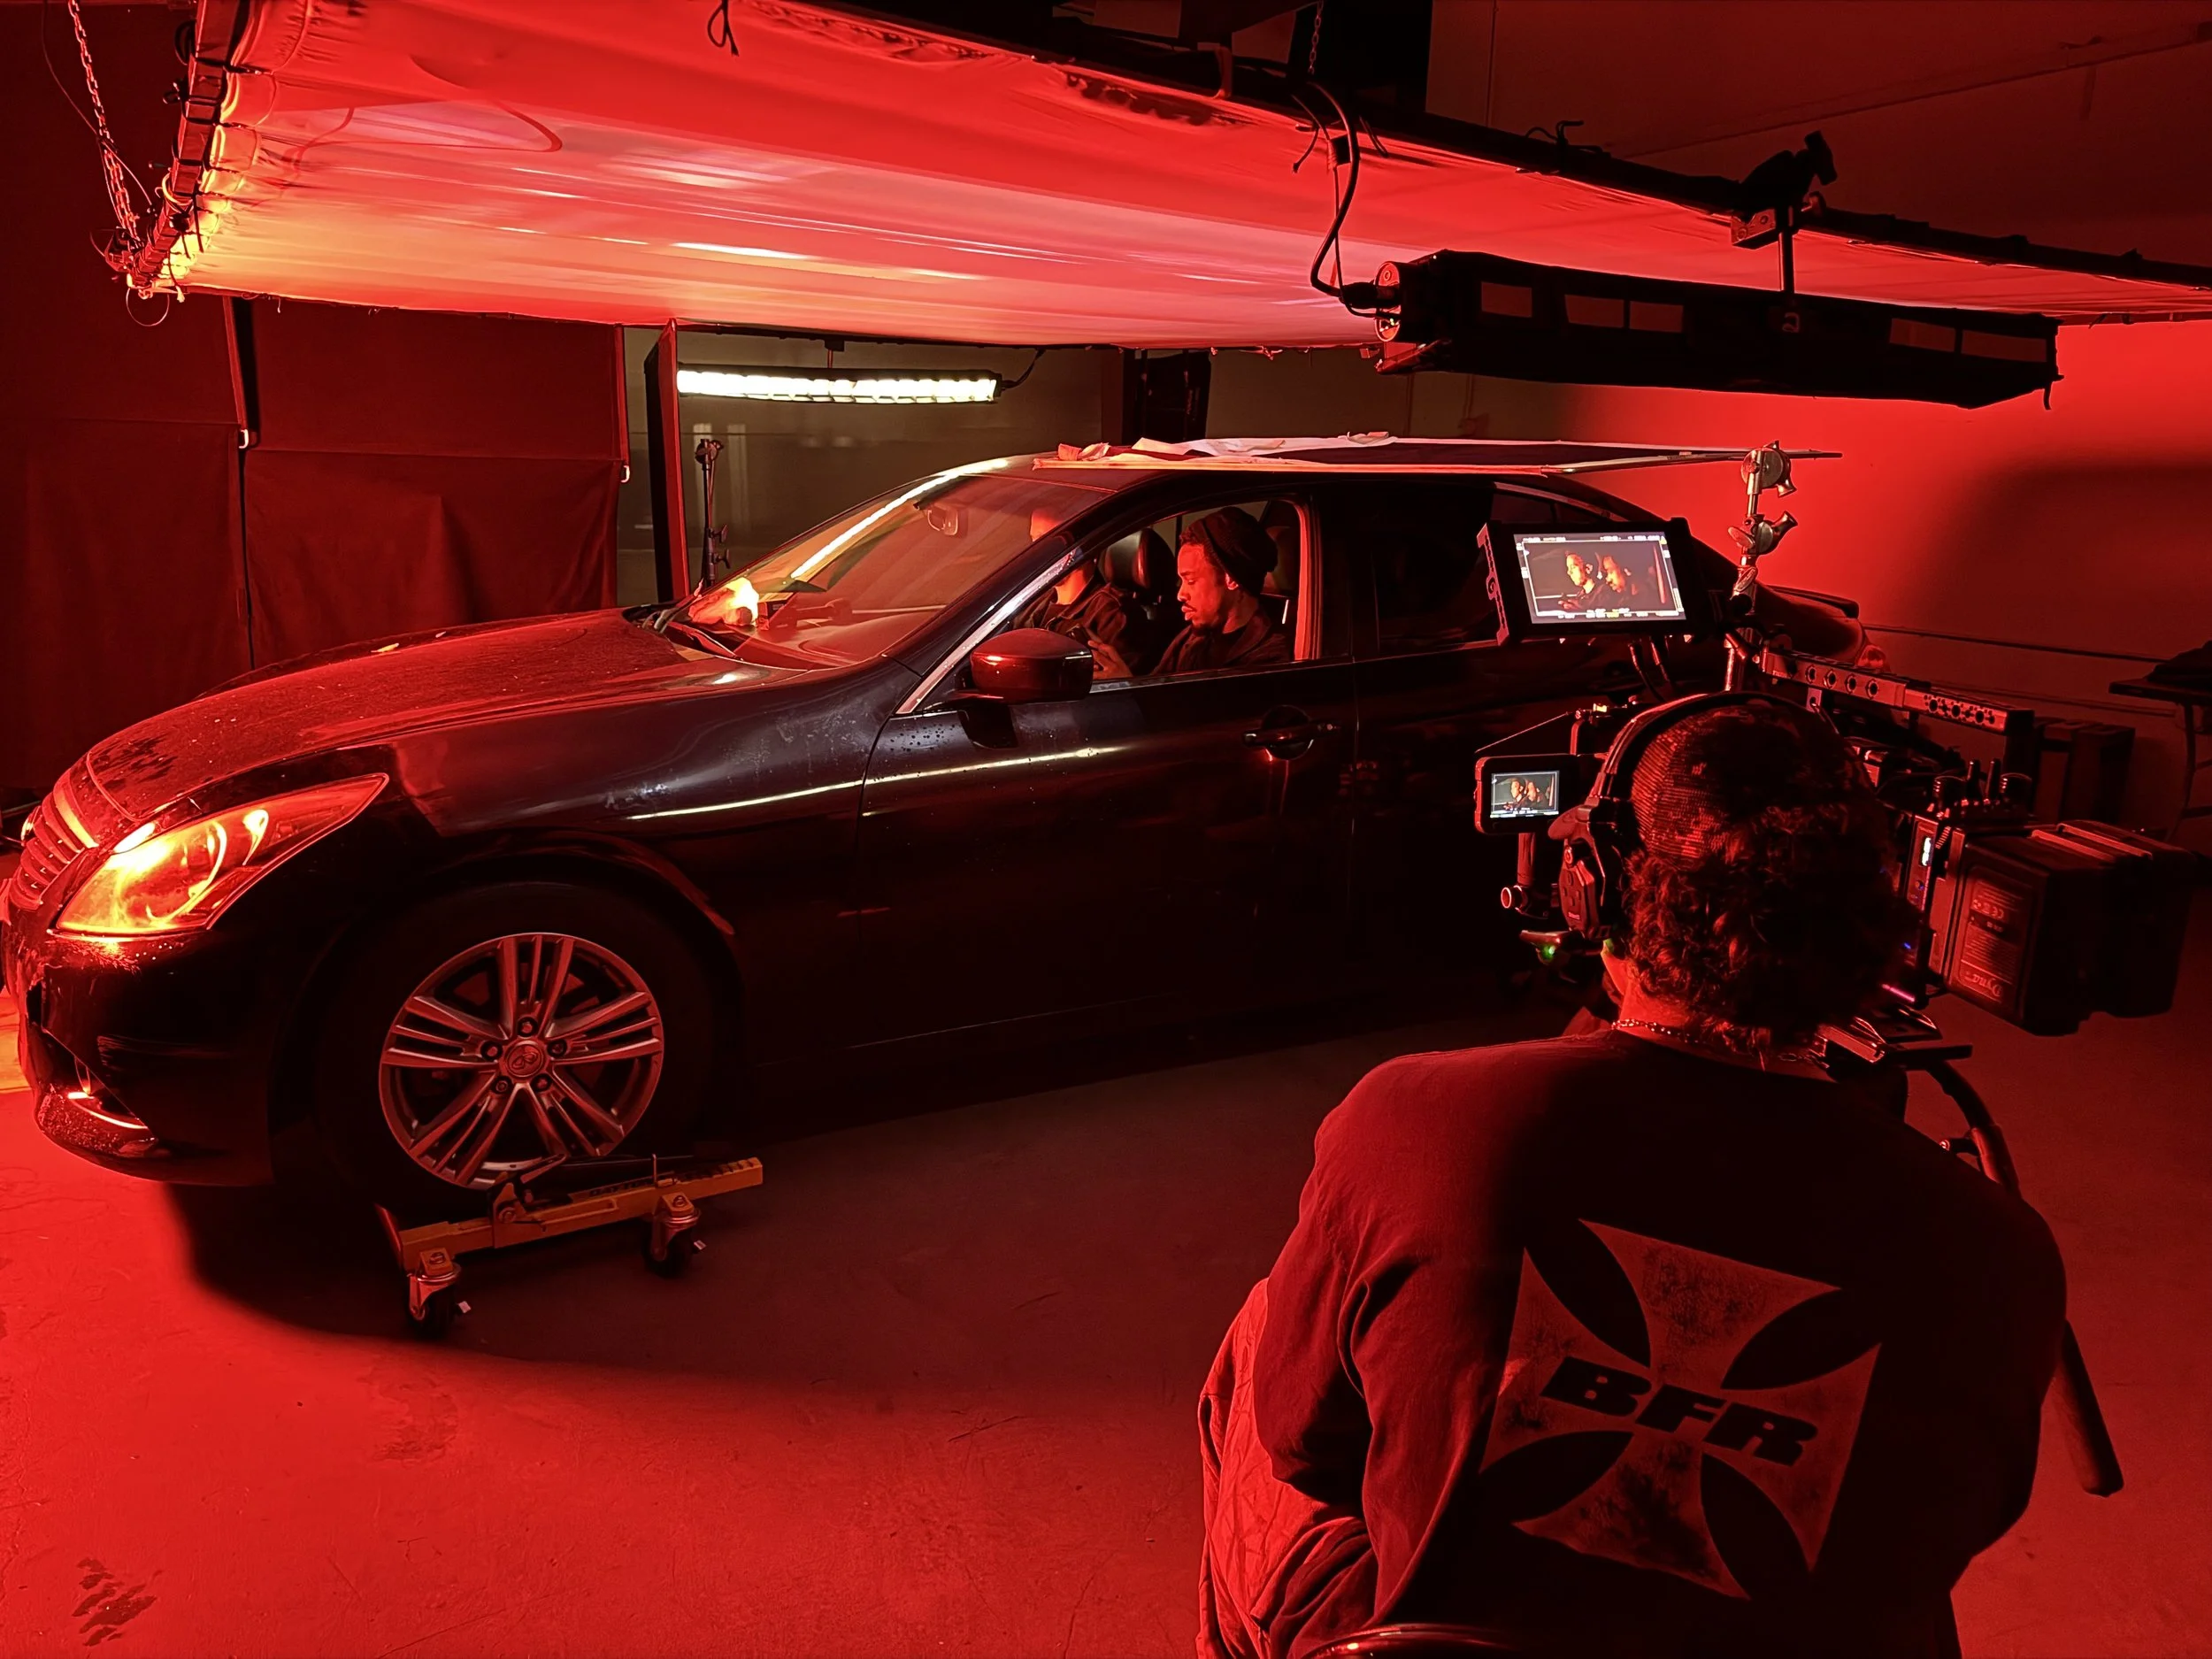
ADR is supposed to save a scene, not drain it. At Genetic Code Pictures in North Hollywood, we focus on what makes dialogue replacement sound alive — performance, comfort, and precision. Our studio combines a relaxed environment with professional tools so actors can reconnect to the moment they created on set.
When the setup feels natural, the actor’s timing and breath match perfectly. That means cleaner sync, faster editing, and dialogue that blends seamlessly with production audio.
Why Producers Choose a Dedicated ADR Environment
Recording ADR in a standard office or editing suite usually leads to problems — reflections, uneven tone, and distracted performances. Our booth is purpose-built for clarity and comfort.
Every session includes:
Industry-standard microphones for film, television, and streaming projects
Quiet, private recording space ideal for both solo actors and full casts
Video playback with visual cueing so talent can lock in sync instantly
Experienced engineer guidance to help directors and producers stay focused on performance rather than setup
The result is a smooth, efficient workflow that keeps creative momentum alive.
Getting the Best from Your Actors
The biggest secret to great ADR isn’t technical — it’s emotional. Actors need to feel grounded in the same energy they had on set. Our space is designed for that. Comfortable seating, adjustable lighting, and real-time playback help talent settle in and perform naturally.
We also allow plenty of space for directors to communicate freely. When actors can see and hear feedback instantly, retakes drop dramatically.
Why It Matters in Post
Bad ADR takes hours to fix. Good ADR disappears. With clean dialogue and accurate sync, editors can focus on the cut instead of trying to match tone or repair phasing. That’s why production teams across Los Angeles choose Genetic Code Pictures — our sessions save time in post and protect the emotional truth of the performance.
Book Your ADR Session
Ready to record? Visit GeneticCodePictures.com or call 213 794 6796 to schedule your session.
Work in a quiet, focused environment built for professional dialogue recording in North Hollywood. Get the performance you need — naturally, efficiently, and on time.
How to Get Perfect Results on a Green Screen Stage in Los Angeles
Get flawless green screen footage without the hassle. Discover how Genetic Code Pictures in North Hollywood delivers even lighting, balanced color, and a ready-to-shoot environment trusted by filmmakers across Los Angeles.

The Secret to a Clean Key
Los Angeles has no shortage of green screen stages, but few are set up to deliver a truly clean key straight out of camera. At Genetic Code Pictures in North Hollywood, we focus on the simple details that make all the difference — even lighting, balanced color, and a safe, comfortable environment for both talent and crew.
Our pre lit green stage is ready to shoot the moment you arrive. Every section of the wall is evenly lit and carefully maintained so your footage pulls clean edges and requires minimal post work.
Why Producers Choose Our Stage
What separates a great green screen from an average one isn’t size or price — it’s reliability. Our stage provides consistent color and lighting from wall to floor, so you can trust what you see in the monitor.
With every booking, you get:
Even, flicker-free lighting across the entire wall
LED fixtures included with no surprise rental fees
Safe, private environment for talent, clients, and crew
Convenient amenities including private parking, kitchen access, and dressing areas
Walk in, power up, and start shooting within minutes.
Common Mistakes We Help You Avoid
Green screen problems are almost always caused by lighting or spacing issues. Our setup is designed to prevent both.
Even light eliminates shadows and hot spots
Proper distance between subject and wall prevents green spill
Daylight-balanced LEDs ensure accurate, natural color
Clean edges reduce time spent on keying in post
You don’t need a huge crew or expensive rentals. Our stage handles the heavy lifting so your team can focus on the creative.
Real Productions. Real Results.
Filmmakers, content creators, and producers choose Genetic Code Pictures because it’s a clean, professional environment that makes production simple. It’s the kind of stage built by people who understand what filmmakers actually need — straightforward setups, reliable lighting, and a space that feels easy to work in.
Book Your Green Screen Stage
Ready to shoot your next project? Visit GeneticCodePictures.com or call 213 794 6796 to check availability.
Skip the uncertainty. Step into a pre lit stage that’s safe, private, and ready for perfect results every time!

5 Mistakes That Ruin Green Screen Shoots (and How to Avoid Them)
Discover how filmmakers and content creators can get flawless green screen results inside our North Hollywood stage — from perfect lighting to pro-grade spill control and camera workflows built for any production scale.
No one plans a bad green-screen day. But every week, studios across Los Angeles watch productions fall apart because someone thought a can of paint and a few lights were all it took.
If you’ve ever pulled a key that looked like a watercolor painting, this guide is for you.
These are the five mistakes we see constantly — and how professionals avoid them.
1. Uneven Lighting Across the Screen
The number-one culprit of a bad key is inconsistent exposure.
Your green background should look boringly perfect — same brightness edge to edge, no hot spots, no dark corners.
When the wall isn’t even, your post team ends up chasing different shades of green frame by frame.
How to Fix It:
Use two broad, soft sources on each side aimed at the screen, not your talent.
Set them to identical color temperature.
Stand behind the camera and squint: if you see gradients, it’s uneven.
Professional stages like ours in North Hollywood stay pre-lit so crews don’t spend hours correcting this.
2. Lighting the Actor and the Screen Together
This is a rookie mistake — blasting both subject and background with the same light.
All that does is spill green onto the performer’s shoulders and cheeks.
How to Fix It:
Separate the subject from the screen by at least six feet.
Light them independently with key, fill, and hair lights.
Add a rim light with slight magenta correction to neutralize any spill.
It’s easier to brighten a clean key than to fix green skin later.
3. Using the Wrong Green
Not all greens are created equal.
Hardware-store “Kelly Green” looks fine to the eye but breaks under studio lights.
It reflects unevenly, especially with LED fixtures that don’t have full-spectrum output.
How to Fix It:
Use professional chroma-key paint or cyc material.
Our stage uses calibrated studio green that maintains uniform hue even under high output.
If you’re painting your own wall, test under your actual lights first — not daylight.
4. Ignoring Spill Control
Light doesn’t stop at the wall.
Without negative fill or proper flags, green light bounces everywhere — turning white shirts into pastel nightmares.
How to Fix It:
Add black duvetyne or solid flags between your screen and subject to absorb excess reflection.
On smaller sets, a simple black cloth behind camera works wonders.
If you’re shooting at a rental stage, ask whether they provide spill control; at our stage, it’s built into the design.
5. Not Planning the Shot for Post
A perfect key means nothing if your post team doesn’t have what they need.
We’ve seen productions shoot 6K green screen only to realize later the subject’s feet were cut off or the background plate didn’t match angle or scale.
How to Fix It:
Storyboards aren’t optional.
Decide your composite plate and lensing before the shoot.
Mark your frame line, reference distance, and camera height.
A few minutes of pre-production saves hours of re-compositing.
The Bigger Picture
A flawless key isn’t luck — it’s control.
Control over light, distance, and workflow.
That’s why a proper stage matters.
At Genetic Code Pictures in North Hollywood, the stage is pre-lit, color-calibrated, and power-mapped so crews can walk in, set their cameras, and shoot within an hour.
You can bring your own DP, build sets, or shoot any creative project that needs precision lighting and quiet space.
Whether you’re capturing interviews, music videos, product demos, or full visual-effects plates, the same rule applies:
Get the basics right, and everything else becomes creative.
If You Remember Nothing Else
Keep your lighting even.
Separate your subject from the screen.
Use real chroma paint.
Kill spill.
Plan the composite.
Do those five things and your colorist will thank you — or at least stop cursing your name.
SEO Title (Squarespace → SEO Tab):
5 Common Green Screen Mistakes (and How to Fix Them) | Genetic Code Pictures North Hollywood
SEO Description:
Avoid the top green screen lighting and keying mistakes professionals make. Learn how to light, control spill, and plan your shots for flawless results at Genetic Code Pictures’ North Hollywood stage.
💡 Why This Post Works
SEO-rich keywords: “green screen,” “lighting,” “North Hollywood,” “stage,” “keying mistakes,” “chroma key.”
Value-driven content: teaches before selling.
Conversion path: subtle mention of your stage as the solution without overt promotion.
Authority tone: reads like a professional DP or studio owner speaking from experience.

Why ADR Sessions Fail — And How to Make Yours Sound Seamless
Behind the scenes of our ADR and voice recording suite in North Hollywood — designed for precise dialogue replacement, remote Source-Connect sessions, and premium Pro Tools recording for film and television.
If you’ve ever watched a film or commercial and thought, “That line feels dubbed,” you’ve just spotted bad ADR.
Automated Dialogue Replacement is one of the most misunderstood steps in post-production — and yet, when done well, no one should ever notice it happened at all.
At Genetic Code Pictures in North Hollywood, we’ve seen every kind of ADR challenge: actors flying in for last-minute pickups, producers patching in from London at 3 a.m., even entire scenes rewritten in post. Whether it’s a studio feature or a small-budget indie, the rules for great ADR never change — and neither do the mistakes that ruin it.
1. Poor Room Choice
ADR should never be recorded in a “music studio.” Dialogue and vocals are completely different beasts. You need a neutral acoustic space — not a reverb-heavy booth. Our ADR stage was designed for clean dialogue capture: dampened walls, tight reflections, and full monitoring through Event Precision 8 reference speakers.
A quiet room doesn’t just sound better — it saves your sound editor hours of EQ repair later.
2. Forgetting the Actor’s Comfort
If the actor’s uncomfortable, the performance suffers. Period.
We keep our sessions relaxed: private parking, water and tea on hand, massage chair in the room, and an engineer who knows when to stay silent. A comfortable actor gives a better read — and you’ll get the take faster.
3. No Visual Context
Actors need to see what they’re matching. Always.
That’s why our ADR system feeds sync-locked picture playback to a large screen, so timing and emotion line up perfectly. Without picture reference, even top-tier talent will drift in pacing and tone.
4. Weak Technical Setup
Dialogue replacement lives or dies on timing.
At our studio, the signal path is fully clocked through an Apogee Big Ben, with CraneSong Spider front-end and Avid I/O conversion — ensuring absolute sync accuracy, whether we’re working in Pro Tools Ultimate, Source-Connect, or Cleanfeed.
Every session is frame-locked to picture — no drift, no guesswork.
5. Failing to Plan the Session
ADR rarely goes smoothly when rushed.
Before rolling, confirm cue sheets, timecodes, and line order. Know if the director is remote or on-site. We provide live Source-Connect monitoring for directors and producers, so creative notes happen in real time — not over a dozen follow-up emails.
🎧 Why It Matters
When ADR blends seamlessly into production sound, your audience forgets post-production ever existed — and that’s the point. It’s invisible craftsmanship.
Our goal isn’t just clean sound; it’s believable emotion. Whether you’re fixing a few lines for a feature or recording a full audiobook, the space, gear, and workflow at Genetic Code Pictures ADR are designed for professional efficiency without the chaos.
🕒 Book an ADR Session
Two-hour minimum.
Half-day and full-day rates available.
Remote direction via Source-Connect, Cleanfeed, or Zoom supported.
🎬 Book online: www.geneticcodepictures.com/adr
📍 Location: 11927 Sherman Road, Unit 2, North Hollywood, CA 91605
📞 Contact: 213-794-6796